The day I've almost broken my Ubuntu
by RetroSome days ago, as all the days of this summer I’ve been working on my thesis project. I was building some programs and one of them was giving me an error about some names that were not recognized. Searching on the internet, these names should have belonged to the libstdc++ library. My first thought was : “Probably this library is missing, let’s try to install it”…
Apt broke even before completing the process. I didn’t understand, I thought it was only an error related to my internet connection. I tried again…
sudo apt install libstdc++xx
I was welcomed with a symbol lookup error: something was not recognized by the system. I tried more commands like ls, mv, cp, but none of them was working.
Then I made the worst mistake I could ever do in this situation: rebooting the PC.

BUMP! Kernel Panic! My OS wouldn’t have loaded beyond that point. (The above image is only an example of what my PC was stuck on)
At that point I only had two options:
-
Installing a fresh Ubuntu copy, but it would have meant losing my thesis project and wasting a lot of time in configuring the system before starting to work again;
-
Finding an actual solution to recover at least all the files I needed for the thesis.
SPOILER: I had a LOOOOOT of luck for this time, but I hope it won’t happen again :(
Solution
Clearly the first mentioned option, was not an actual option: I needed to recover all my files and waste the least time I could.
Obtaining a shell
The first thing I thought to, was obtaining a shell: but before that, let’s analise where we are now:

Following this guide but also trivially making a reference to the name of the problem I’ve had, it is easy to confirm that we’re in the Kernel. GRUB has already been executed, I’ve selected the kernel I want to load, and it is the moment for the kernel to load /sbin/init. But how we can see in the first image, there is a problem that prevents the kernel to run init, that’s why we get the kernel panic and in particular the last message “Attempted to kill init”.
But at this point… what if we make the kernel run /bin/bash as the first process? To do so, just access the GRUB:

and at this point, by pressing “e” on the keyboard there is the possibility to modify the command that the kernel will execute:

by changing “ro” (read-only) to “rw” (read-write) we will actually have the privileges for writing and editing files in the system; plus, if we also add “init=/bin/bash” we’re asking the kernel to start our shell as first process instead of the classical init file.
How I’ve already mentioned, it will be executed by the kernel, and if it is not clear, this picture should be crystalline:
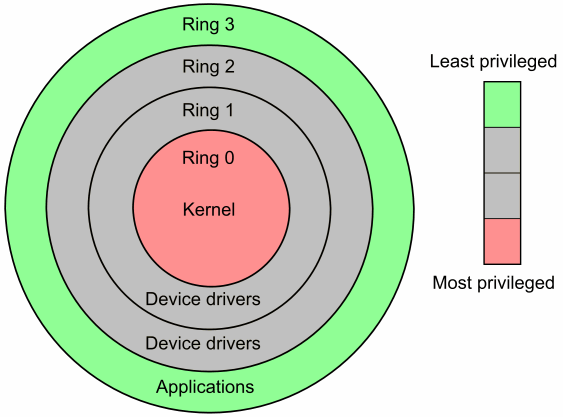
Kernel runs as supervisor, while applications run at the user level, with the same privileges as the user that runs them. Kernel can access user space too.
Well: after pressing F10 to pass those parameters to the kernel, I’ve obtained my shell as root user:

As suggested here, this is useful if we want to change the password of the root user or, by an offensive point of view, if an attacker physically steals a device and wants to access the files circumventing the login: this can be prevented by password protecting the GRUB.
Coming back to my problem… I’ve obtained my shell and also learned a new thing… but any command I needed was still broken because of the symbol lookup error! So I needed an alternative.
Note: the command we’ve inserted to run the shell at boot time is reset after a reboot: there is no need to reverse the edits.
Solving the problem through the Live USB
Luckily I already had my Live USB with Ubuntu configured and ready to be booted. I plugged the USB and started the Ubuntu live version. In this way I’ve had the possibility to mount the partition on which all my files were saved and access them: I only needed to run the command mount /dev/sda5 /mnt ; clearly replace sda5 with your partition if you have a similar problem.
At this point I have read and write access to all my files! My thesis project was safe. But I wanted more: I wanted to save my Ubuntu too.
Considering that my problem was related to a library, I did an unconsiderate, but strangely working move: I’ve first compared the libraries present on a fresh Ubuntu (ls /usr/lib/)system with the libraries I had on my Ubuntu (ls /mnt/usr/lib), and successively, I’ve deleted the ecceding files: any library that wasn’t needed has been deleted, it didn’t matter if some programs would have been corrupted by this: in that case I just should have reinstalled the program with apt.
…REBOOT TIME…

Finally my Ubuntu was back! I didn’t lose anything and I was ready to come back to my project!
I hope that my experience will be useful to all of you that face this problem and need to recover all the files, at least, and if possible restore the system to its functional state.
If you have any question, want to ask me anything or give me any advice, just contact me and I will be super-available to answer to all of you! Hope to see you again!
tags: General - Blog - Linux - Hacking